DIY: How to Install A French Drain
Installing a French Drain can be a great option if you have standing water or pooling water and need to divert it to an area with better drainage. Building your own French drain is simpler than you think!
Here are 7 steps to make your own French drain.

Plan the Location
First, make sure that the pooling water isn’t caused by a leak. If it is a leak, repair it instead of installing the French Drain.
When choosing an outlet for runoff water, you can choose to let the water flow out to the curb if that’s the easiest option.
Be a good neighbor and make sure you’re not diverting water into someone else’s land.
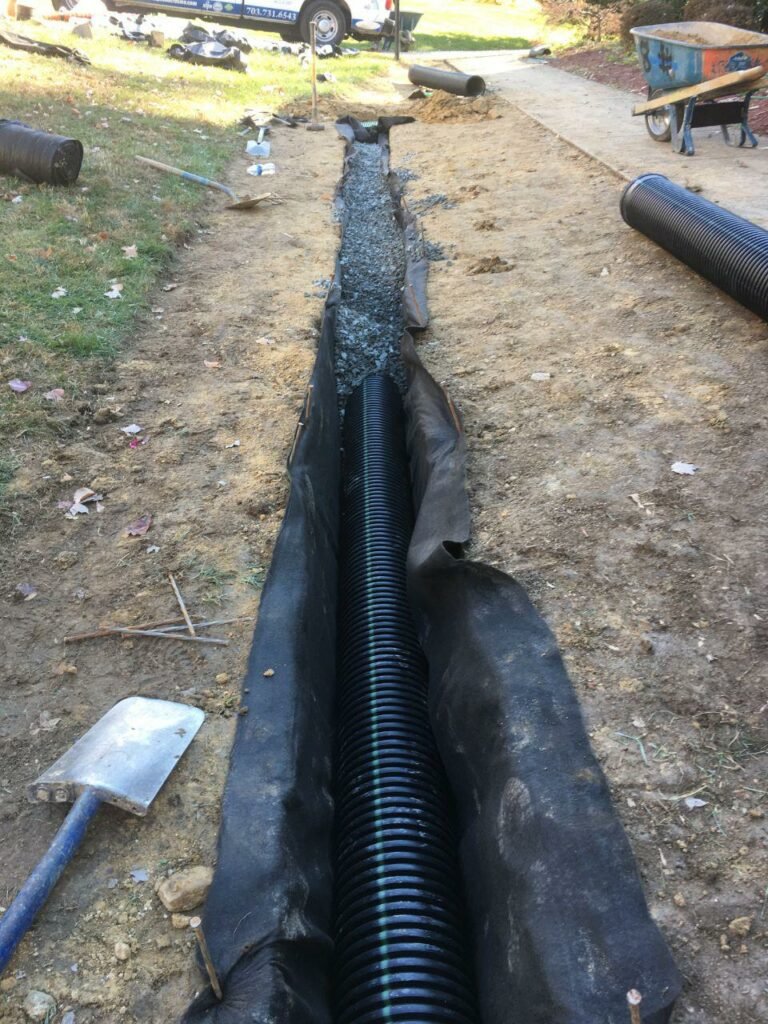
The trench will be about 18 inches deep and 9-12 inches wide.
Use flags or spray paint to mark off the area where you want to install your French drain.
Your French drain should drain from a higher elevation and let out at a lower elevation.
Make sure you aren’t draining water back toward your home!
Check zoning restrictions.

2. Dig your Trench
Check for underground utility lines- In many areas you can call 811 to make sure you aren’t digging into existing utility lines.
French drains need to have a slope of at least 1% which means your pipe should slope down 1 inch for every 10 feet of pipe.
You will dig with shovels or if your French drain is larger, you can consider renting a trencher.

3. Line the Trench with Filter Fabric & Pour the Gravel Bedding
Lay water permeable filter fabric to keep the drain free from dirt, silt, and tree roots.
Leave the filter fabric open with at least 10 inches of excess fabric on each side.
Pour about 3 inches of gravel in the trench on top of the filter fabric and compact with a tamper or with your foot or a metal rake. This will act as a bed for the drainage pipe.
4. Hook Up the Pipe Connections
Install an inlet grate at the point where the water pools the most.
Add pipe and connect as many as needed to extend from the inlet grate to the outlet point. You’ll want to measure the distance so you can make sure to purchase enough pipe and gravel.
You may use a flexible drainage hose or you may opt for a longer-lasting PVC pipe. If you choose PVC pipe make sure to drill holes in the pipe every 6 inches.
5. Set the Pipe Drain in the Trench
Lay the connected pipe on top of the Gravel bedding in the ditch. Make sure the drainage holes are facing down.
Pour water into the inlet grate to test the flow of the drain.

6. Cover the Trench with Gravel, Filter Fabric, and Soil
Cover the pipe with 3 inches of crushed stone.
Wrap the excess filter fabric around the pipe for added protection.
Backfill the area with the removed topsoil and tamp it down to completely cover the French drain system.
Reseed the area or lay landscaping stone.
7. Ongoing Maintenance
Regularly inspect your inlet grate and outlet point and flush debris when needed. If a problem arises you may have to dig up your French drain to inspect and repair it.
We recommend leaving the area covered with stone instead of covering it with grass for easier access to repair and maintain.
At Metro Materials we can help with all of your landscaping and DIY needs. Use our handy calculator here to calculate how much gravel or stone you’ll need to create your very own French Drain System. We provide our customers with consistent quality products, dependable delivery times, and all the information they need to make a smart purchase. If you are in the Norman, Oklahoma City, or Edmond, Oklahoma area give us a call and let us deliver your stone, gravel, soil, or mulch to your home today.